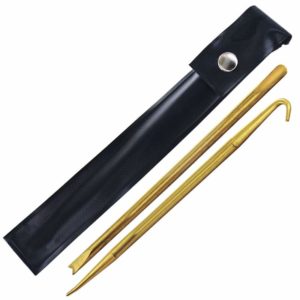
 It might be argued that no other component is more overlooked in fluid power systems than the most crucial one—the O-ring. O-rings are vital to those systems functioning properly. Therefore, having an O-ring installation tool will ensure the proper installation of the O-ring itself. The right O-ring installation tools can help avoid or even prevent problems with the O-ring that may lead to overstretching, a cracked seal, incorrect gland volume, incorrect sizing, placement, and so on.
Any trained mechanic will tell you that O-ring replacement is a fast, near effortless, easy process. Simply pull the old seal out of its groove and place a new one in its place. A trained mechanic will have an advantage. More than years of experience, he or she will also have the right tools. Having the right tools will make sure of the seal’s functionality when the job is completed. Whether removing or installing O-rings from cylinders and other machinery, a mechanic’s best friend is the O-ring installation and extraction tool kit.
How to Properly Replace and Install an O-Ring
Having the tool kit is essential; knowing what to do with it is as easy as following these 7 steps. By doing so, you can properly install an O-ring:
Step 1: Once the device, machine, motor, equipment, etc., is ready for O-ring maintenance, begin by extracting the worn O-ring. For best results, utilize the Parker O-Ring Installation and Extraction Tool Kit to remove the O-ring. The double-ended brass tools allow for easy extraction and will prevent damage to the seal’s surface.
Step 2: Clean the O-ring glands and surface area where the O-ring is to be applied. Make sure each are free of debris, dust or any contaminants or particles that could compromise the O-ring’s integrity. Even if an O-ring is installed correctly, surface contaminants can lead to premature failure of the seal.
Step 3: Ensure the correct size and measurement of the O-ring with the Parker Size Gauge for O-Rings application. The device consists of a marked plastic cone with a special cross-section measuring base and a separate pi tape. It’s ideal for checking any sample size O-ring diameter to eight inches. The slide gauge can measure the inside diameter of O-rings up to thirteen inches. The right size seal is important. Pushing a seal into place or stretching it around the track will result in inadequate sealing and eventually, premature seal failure.
Step 4: Once removing, cleaning, and sizing is completed, lubricate the O-ring with Parker O-Lube, a barium-based petroleum grease formulated to extend the service life of synthetic rubber O-rings and seals. Apply a thin layer of lubricant to the O-ring surface and the seal surface. Parker O-Lube provides adherence, lubrication, and water resistance. It can withstand a temperature range from -20°F to +300°F and is recommended for low-pressure pneumatic systems as well as reciprocating and low-speed rotary or oscillating applications. For micronic filters or non-petroleum based seal materials use Parker Super O-Lube to extend the life of the seal.
Step 5: After preparation steps are completed, place the new O-ring into the groove or slot with the brass installation tools. Do not force it, guide it into place on the surface.
Step 6: Once the seal is installed, align and evenly distribute the O-ring along the groove track.
Step 7: Once the O-ring is installed, reassemble the device or machinery, and clean the tools until needed.

What’s Next? How to Pro-Long the Life of the O-Ring
An O-ring is easily identifiable and one of the most common types of seals found worldwide. They are used in a variety of applications, in unlimited sizes across a wide range of industries—including the transportation, electronics, chemical, energy, and medical sectors. Like any part, O-rings require maintenance and replacement. Make the installation and extraction of these important components easier with the right tools and following this handy guide.

